Multi-Page and Multi-Figure Examples
Source:vignettes/multi_page_examples.Rmd
multi_page_examples.RmdIntroduction
This document discusses advanced uses of gridify, to
automate the generation of multiple figures or tables. It is recommended
that you start with
vignette("gridify", package = "gridify") and
vignette("simple_examples", package = "gridify"), before
continuing with this vignette.
The magrittr and ggplot2 packages will be
useful for the examples.
Figures
In this section, we will be discussing a method to automate the
generation of multiple figures for data visualization. The code provided
below is written in R and uses the ggplot2 and
gridify libraries.
The process involves:
- Defining the necessary data
- Creating a function to generate each figure
- Using loops to create and save each output, with
sprintf()to template text elements
This strategy is particularly useful when you have a large number of figures to generate that share common text elements.
Multiple Figure Delivery with a for-loop and sprintf
When creating multiple figures at once, it can be useful to have some metadata relating to your cell text in a list to help automate the process of adding titles, footers, etc. This could be via a dataset created in your code, or a separate file that is read in, e.g. an excel file.
In the example below, we have created some dummy metadata based on
the mtcars dataset. The elements in global
apply to all figures, the others are figure specific so have been listed
individually.
figures_data <- list(
  global = list(
    project = "My Project",
    indication = "My Indication",
    study = "My Study",
    cutoff = "Data Cut-off: YYYY-MM-DD",
    program = "program1.R",
    var1 = "mpg",
    note1 = "Note: Violin figure: compact display of continuous distribution; it is a blend of boxplot and density,
    the latter based on a Gaussian kernel estimator.",
    note2 = "Note: Placebo subjects switched to Study Drug at/after Week 16.",
    note3 = "Note: Total Study Drug includes subjects randomized to Placebo and to Study Drug.",
    note4 = "Note: N denotes the treatment population and n denotes the contributing population for
    the analysis for each treatment, parameter and visit"
  ),
  figures = list(
    figure1 = list(
      number = "1.1",
      title1 = "My title Group A",
      title2 = "My title 2",
      var2 = "wt"
    ),
    figure2 = list(
      number = "1.2",
      title1 = "My Title Group B",
      title2 = "My title 2",
      var2 = "cyl"
    )
  )
)
If you already have a dataset, such as an excel file, then you can process this file to get a proper list. You should add additional columns to the file to help build each figure.
library(readxl)

dat <- readxl::read_excel("PATH TO YOUR FILE")
figures <- lapply(seq_len(nrow(dat)), function(row) dat[row, ])
# Optionally, you can add names to the elements of 'figures' so you won't have to subset by index later
names(figures) <- paste0("figure", seq_along(figures))
# Alternatively, you can leave the 'dat' object as it is and loop through its rows,
# or with row names if available
It would be helpful to create a figure-generating function with arguments that affect the elements of the output, an example of this could be:
generate_figure <- function(data, var1, var2) {
  ggplot2::ggplot(data, ggplot2::aes(x = !!as.name(var1), y = !!as.name(var2))) +
    ggplot2::geom_line()
}
You want to collect all figures in a separate list. Here, the
variable figures_list is a container for our outputs.
figures_list <- list()Optionally, set global variables, which are usually defined at the top of a script.
COMPANY <- "My Company"
STATUS <- "DRAFT"
Now you can run a for-loop to generate many gridify
objects.
for (figure_index in seq_along(figures_data$figures)) {
  figure_obj <- generate_figure(mtcars, figures_data$global$var1, figures_data$figures[[figure_index]]$var2)

  # Add text elements using `sprintf()`
  gridify_obj <- gridify(
    object = figure_obj,
    layout = pharma_layout_A4()
  ) %>%
    # Add STATIC text elements to the `gridify` object
    # You can define these values as variables at the top of your script
    set_cell("header_left_1", COMPANY) %>%
    set_cell("watermark", toupper(STATUS)) %>%
    set_cell("header_right_2", STATUS) %>%
    # Add VARIABLE text elements to the gridify object
    set_cell("header_left_2", sprintf("%s / %s", figures_data$global$project, figures_data$global$indication)) %>%
    set_cell("header_left_3", figures_data$global$study) %>%
    set_cell("header_right_3", sprintf("%s", figures_data$global$cutoff)) %>%
    set_cell("output_num", sprintf("Output %s", figures_data$figures[[figure_index]]$number)) %>%
    set_cell("title_1", figures_data$figures[[figure_index]]$title1) %>%
    set_cell("title_2", figures_data$figures[[figure_index]]$title2) %>%
    set_cell("note", paste(figures_data$global[c("note1", "note2", "note3", "note4")], collapse = "\n")) %>%
    set_cell("footer_left", sprintf("Program: %s, %s", figures_data$global$program, Sys.time())) %>%
    set_cell("footer_right", sprintf("Page %s of %s", figure_index, length(figures_data$figures)))

  figures_list[[figure_index]] <- gridify_obj
}
.Rmd and .Qmd documents should be
considered as alternatives for saving gridify objects,
which can be used directly in your Rmd and Qmd documents, similar to the
gridify package vignettes.
You can generate a PDF for each figure individually and then combine them in software like Acrobat.
if (!dir.exists("figures")) {
  dir.create("figures")
}
export_to(
  figures_list,
  sprintf("./figures/test_Company_A4_layout_%s.pdf", seq_along(figures_list))
)
Or you can generate a single PDF file with all figures.
export_to(
  figures_list,
  "./figures/test_multi_Company_A4_layout.pdf"
)
Tables
For PDF/DOCX
Large tables can be difficult to display on a single page, with the
shrunken dimensions making them hard to read and interpret.
gridify, in combination with the gt package,
solves this by allowing you to split tables based on row limits, helping
maintain a professional format. Here is an example of this in practice
when creating outputs for pdf/docx files.
Splitting By Rows for PDF
If you are dealing with an extensive table, displaying all the data on a single page can make it difficult to read. This is where splitting the table based on the number of rows is an effective solution.
Let’s see how this can be implemented.
Using the paginate_table() Helper Function
(Recommended)
The gridify package provides a lightweight helper
function paginate_table() to simplify the pagination
process:
table_cols <- c("cyl", "vs", "am", "drat", "qsec") # Columns that appear in final output
df <- mtcars[, table_cols]
rows_per_page <- 10

# Use the helper function to split the table
pages <- paginate_table(
  df,
  rows_per_page = rows_per_page,
  fill_empty = " "  # Optional: fills last page with a string for consistent positioning
)

number_of_pages <- length(pages)
This is the recommended approach as it’s simpler and handles edge cases automatically.
Finally, we generate each page of the output, by converting each
table into a gtable with the gt package then
looping over the gridify function.
# Define styling parameters
row_height_pixels <- 10
font_size <- 12
font_type <- "serif"

results_list <- list()
for (iter in seq_along(pages)) {
  gt_input <- gt(pages[[iter]]) %>%
    tab_options(
      table.width = pct(80),
      data_row.padding = px(row_height_pixels),
      page.numbering = TRUE,
      table.font.size = font_size,
      table.font.names = font_type
    )

  results_list[[iter]] <- gridify(
    gt_input,
    layout = pharma_layout_A4(global_gpar = grid::gpar(fontfamily = font_type))
  ) %>%
    set_cell("header_left_1", "My Company") %>%
    set_cell("header_left_2", "<PROJECT> / <INDICATION>") %>%
    set_cell("header_left_3", "<STUDY>") %>%
    set_cell("header_right_1", "CONFIDENTIAL") %>%
    set_cell("header_right_2", "<Draft or Final>") %>%
    set_cell("header_right_3", "Data Cut-off: YYYY-MM-DD") %>%
    set_cell("output_num", "<Output> xx.xx.xx") %>%
    set_cell("title_1", "<Title 1>") %>%
    set_cell("title_2", "<Title 2>") %>%
    set_cell("title_3", "<Optional Title 3>") %>%
    set_cell("note", "<Note or Footnotes>") %>%
    set_cell("references", "<References:>") %>%
    set_cell("footer_left", "Program: <PROGRAM NAME>, YYYY-MM-DD at HH:MM") %>%
    set_cell("footer_right", paste0("Page ", iter, " of ", number_of_pages)) %>%
    set_cell("watermark", "DRAFT")
}

print(results_list[[1]])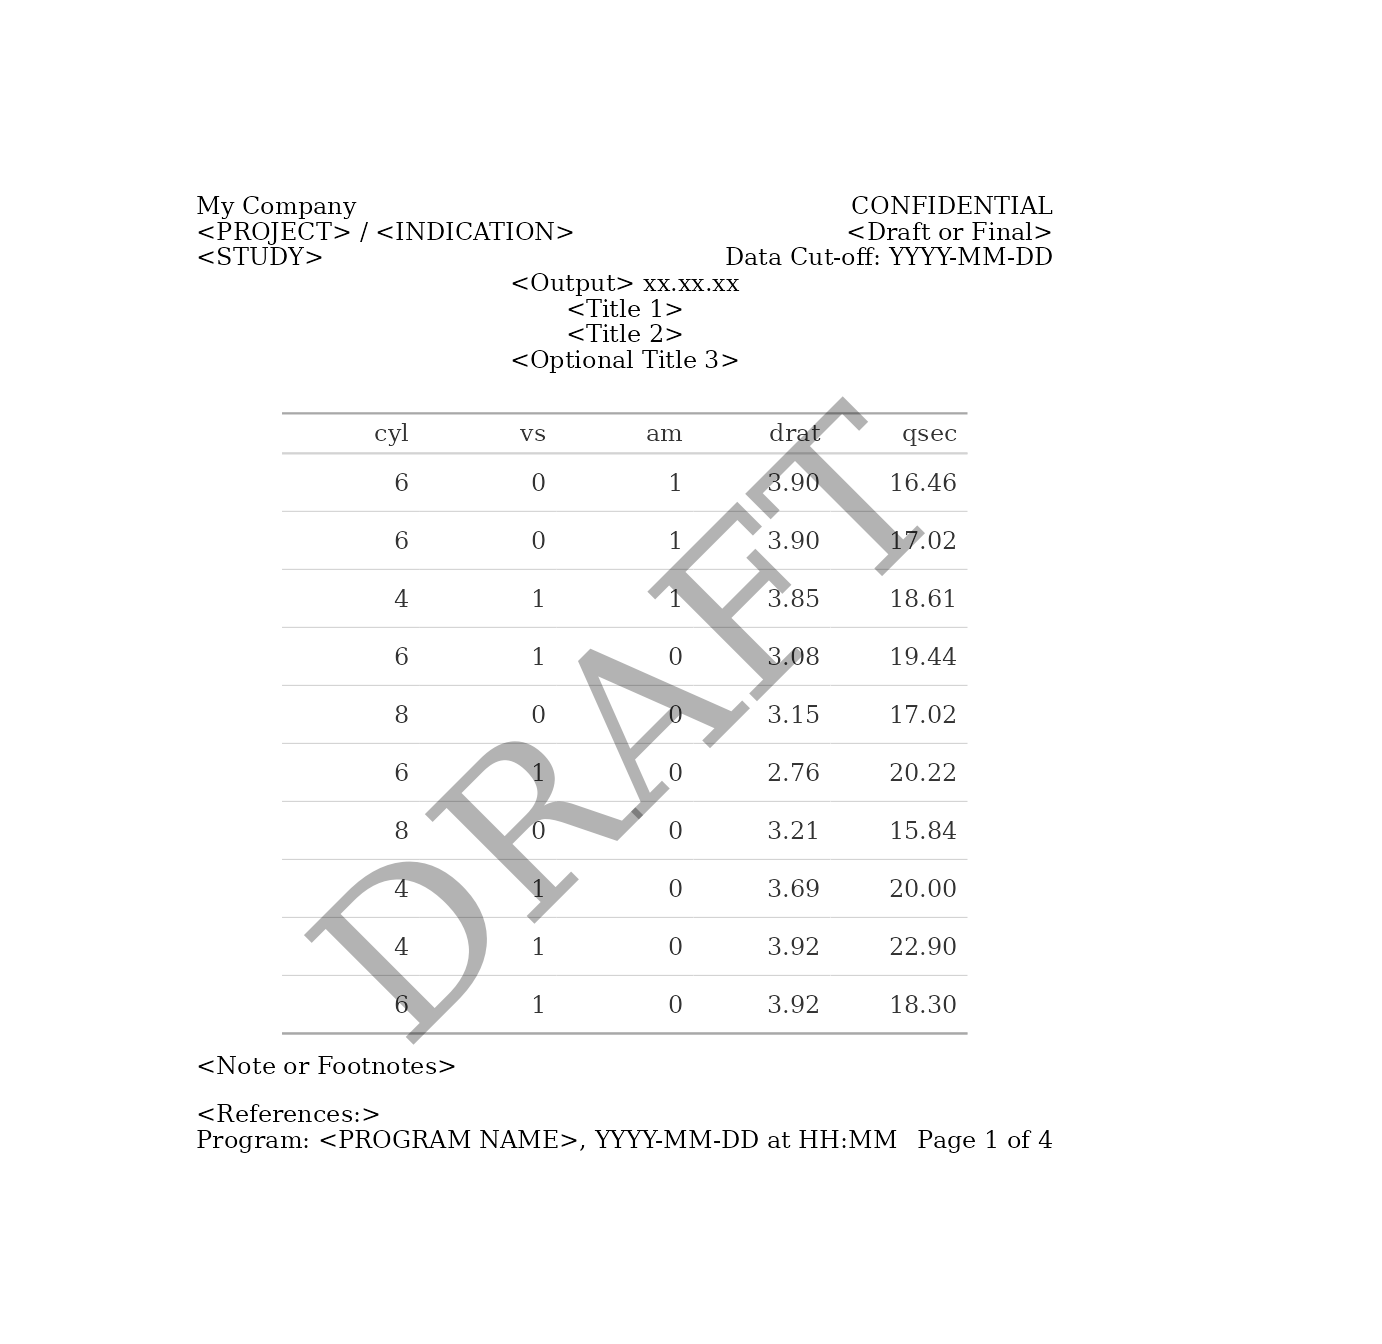
You can find out more examples in the help of
?paginate_table.
Export To PDF, JPG and PNG
gridify supports three file types in
export_to(): PDF, JPG, and PNG.
Using the result from the previous example, the first argument of
export_to() is either your gridify object or a
list of them, and the second is either the desired file path (including
file name) or a vector of them.
if (!dir.exists("tables")) {
  dir.create("tables")
}
Multi-page outputs.
For multi-page outputs, PDFs are the most convenient to use. As
mentioned earlier, Rmd and Qmd documents are alternatives for saving
gridify objects, which can be saved directly into your
.Rmd and .Qmd documents.
export_to(
  results_list,
  to = "./tables/multipageA4.pdf"
)

export_to(
  results_list,
  to = "./tables/multipageA4portrait.pdf",
  width = 8.3,
  height = 11.7
)
To export as a PNG or JPG, you have two options:
2. Export multiple images
This is done by providing a list of names for to. The
lengths of the names vector and the gridify input must be
the same.
export_to(
  results_list,
  to = file.path("./tables", sprintf("singlepage%s.png", seq_along(results_list))),
  width = 2400,
  height = 2000,
  res = 300
)

export_to(
  results_list,
  to = file.path("./tables", sprintf("singlepage%s.jpg", seq_along(results_list))),
  width = 2400,
  height = 2000,
  res = 300
)

export_to(
  results_list,
  to = file.path("./tables", sprintf("singlepage%s.pdf", seq_along(results_list))),
  width = 2400,
  height = 2000,
  res = 300
)
Extending The Multi-Page Example
In pharmaceutical and other industries, presenting tables often
requires customization to meet reporting standards. While splitting by
rows is a common approach for handling large datasets, it is not the
only option. Here are some potential ways in which a table could be
split up, where gridify could then be used to generate a
new page for each table:
- Group by columns: Create separate tables for each unique combination of selected columns, such as treatment groups, geographic regions, or product categories.
- Split by columns: When dealing with wide datasets, distribute columns across multiple tables to improve readability, such as separating different performance metrics or variable types.
- Retain a key column: Ensure essential identifiers (e.g., PatientID or TransactionID) appear on every page for easy reference and consistency.
These methods provide greater flexibility in structuring tables, making them easier to interpret and align with diverse reporting needs across industries.
Long Table in HTML
When rendering a .Rmd or .Qmd document into HTML, using ‘fixed’ scale measurements for heights is essential to prevent excessive scrolling or content being cut off. Additionally, layout margins should be defined in absolute units, such as inches, cm or mm.
When trying to find the perfect fig.width and
fig.height for the output, instead of guessing, you can use
a binary search method to quickly find the ideal height. Here is an
example:
- Start with a range (e.g., 20 to 120 inches).
- Test the midpoint: Try 70 inches (the average of 20 and 120).
- Adjust based on results:
- If 70 inches is too tall, reduce the value to 45 inches (average of 20 and 70); if too short, increase it to 95 inches (average of 70 and 120).
- Repeat the process
Keep refining and you will quickly find the optimal height.
The R code below has fig.width = 8 and
fig.height = 45. Note that
pharma_layout_letter is using the default heights (similar
to "fixed" scales) and margins in
"inches".
gt_obj <- gt::gt(Theoph)

g <- gridify(
  object = gt_obj,
  layout = pharma_layout_letter()
) %>%
  set_cell("header_left_1", "My Company") %>%
  set_cell("header_left_2", "<PROJECT> / <INDICATION>") %>%
  set_cell("header_left_3", "<STUDY>") %>%
  set_cell("header_right_2", "<Draft or Final>") %>%
  set_cell("output_num", "<Table> xx.xx.xx") %>%
  set_cell("title_1", "<Title 1>") %>%
  set_cell("title_2", "<Title 2>") %>%
  set_cell("note", "<Note or Footnotes>") %>%
  set_cell("references", "<References:>") %>%
  set_cell("footer_left", "Program: <PROGRAM NAME>, YYYY-MM-DD at HH:MM") %>%
  set_cell("footer_right", "Page xx of nn")

print(g)